Morphomeca
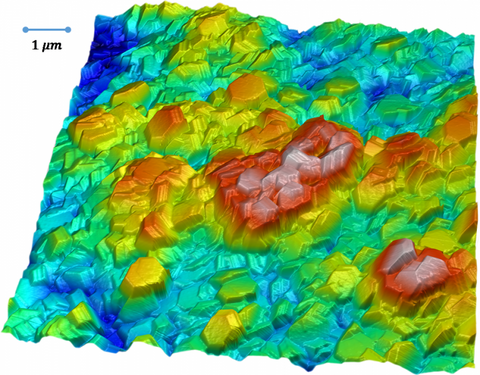
The platform is dedicated to the morphological exploration and analysis of surfaces from decimeter to nanometer scales.
What is Morpho-Mechanics?
Morpho-Mechanics is measuring the topography of an object's surface and applying a morphological treatment methodology adapted to its environment in order to characterize its history, quantify its properties and thus increase desired functionalities while guaranteeing its structural integrity.
MORPHOMECA, a multidisciplinary platform
Inaugurated in 2017, the MORPHOMECA platform is dedicated to the morphological exploration and analysis of surfaces, from decimetric to nanometric scales.
The objective of the MORPHOMECA platform is to build tools for morphological exploration of the surface, at the scales where physical, chemical or biological phenomena appear (cell sizes in biology, abrasive particles in wear...).
This multidisciplinary platform allows the investigation of various disciplinary fields (mechanics, chemistry, optics, archaeology, medical, sensory, art ...) whose common denominator is the understanding of physical mechanisms at interfaces.
A request from many industrialists
Many industrial companies, from small and medium-sized businesses to large corporations, request this platform and the associated processing tools to study manufactured surfaces and thus optimize their functionality and physical integrity. The engineers and researchers of the teams associated with this platform participate in the development of prototypes with manufacturers of surface exploration equipment (Bruker USA, Alicona Austria, Altimet France) and software solution editors (DigitalSurf France).
Numerous partnerships
Thanks to these partnerships, the MORPHOMECA platform has the latest innovations in terms of morphological characterization. It brings together a unique set of equipment, combining different dimensional metrological techniques. This multiplicity of methods of morphological characterization makes the measurement of surfaces at each scale representative of the phenomena to be observed more reliable. The integration and a strong coupling of instrumental techniques allow a geometric description of surfaces from decimetric to nanometric scales, without breaking the dimensional continuum.
The platform's equipment
The platform, referenced at CNRS and Carnot institutes, includes:
- A tactile : Bruker Dektak XT
- A focus variation microscope : Alicona Infinite Focus G5
- A portable focus variation microscope : Alicona Infinite Focus Portable RL
- A focus variation prototype microscope (Bruker USA / MORPHOMECA partnership) : Bruker Contour LS-K
- An interferometer: Zygo Newview 7300 (VSI - Vertical Scanning Interferometry)
- An interferometer : Bruker Contour GT (VSI, PSI - Phase Shifting Interferometry)
- An atomic force microscope (AFM) : Bruker Dimension Edge
- A multiscale temperature tribo-indicator : Bruker UMT Tribolab
- An environmental temperature : Bruker TriboIndentor HysitronTI980
Beyond the non-standard measurement means, the team relies on the MesRug expert system, to ensure the processing and analysis of morphological databases, quantify the relevant physical scales and provide robust numerical indicators associated with the studied phenomena. Software is developed to explain the formation of the measured morphologies (wear, sandblasting, diffusion...). Other software is implemented to model the interaction of physical phenomena with the measured surface (gloss, light transmission, cell adhesion, sealing...).
| Nom de l'équipement | Modèle | Marque | Informations spécifiques |
|---|---|---|---|
| Profilomètre tactile |
Bruker |
||
|
Microscope à variation de focus |
Infinite focus G5 |
Alicona |
|
| Microscope à variation de focus portable |
Alicona |
||
| Microscope à variation de focus (prototype) | Contour LS-K | Bruker | |
| Interféromètre | Newview 7300 | Zygo | VSI - Vertical Scanning Interferometry |
| Interféromètre | Contour GT | Bruker | VSI, PSI - Phase Shifting Interferometry |
| Microscope à force atomique (AFM) | Dimension Edge | Bruker | |
| Nano-indenteur environnemental en température | Tribo-Indenteur HysitronTI980 | Bruker | |
| Dome De Reflectance | Prototype | Altimet | |
| Laser Femto seconde | SFT22 ~ Satsuma HP3 | ES-laser ~ Amplitudes | ES-Laser a conçu une machine SFT22 autour de la tête laser Satsuma HP3 de la marque Amplitude |
The platform's equipment
The platform, referenced at CNRS and Carnot institutes, includes:
- A tactile : Bruker Dektak XT
- A focus variation microscope : Alicona Infinite Focus G5
- A portable focus variation microscope : Alicona Infinite Focus Portable RL
- A focus variation prototype microscope (Bruker USA / MORPHOMECA partnership) : Bruker Contour LS-K
- An interferometer: Zygo Newview 7300 (VSI - Vertical Scanning Interferometry)
- An interferometer : Bruker Contour GT (VSI, PSI - Phase Shifting Interferometry)
- An atomic force microscope (AFM) : Bruker Dimension Edge
- A multiscale temperature tribo-indicator : Bruker UMT Tribolab
- An environmental temperature : Bruker TriboIndentor HysitronTI980
Beyond the non-standard measurement means, the team relies on the MesRug expert system, to ensure the processing and analysis of morphological databases, quantify the relevant physical scales and provide robust numerical indicators associated with the studied phenomena. Software is developed to explain the formation of the measured morphologies (wear, sandblasting, diffusion...). Other software is implemented to model the interaction of physical phenomena with the measured surface (gloss, light transmission, cell adhesion, sealing...).
Financeurs
ELSAT2020, GDR CNRS Topologie des Surfaces, INSA, Instituts Carnot, ANR et contrats industriels (Grands groupes, PME, TPME), partenariats public-privé.

Partenaires industriels
Bruker, DigitalSurf, Essilor.
Mots-clés
Surface ; Caractérisation ; Topographie ; Fonctionnalisation ; Tribologie ; Propriétés micromécaniques ; Texturation ; Rugosité; Sensoriel; Fractographie ; Biomatériaux ; Implantologie ; Archéologie ; Métallurgie ; étanchéité ; métrologie.


